Let's do it together Let's do it together

Your Guide to Painting Walls and Ceilings

As we prepare for autumn its time to fix and maintain the home. Where we have enjoyed the summer and may have let jobs slide, its time to use the extra time now kids are back at school to prepare the house for getting cosy in winter. We have a great range of over 100 on trend colours to chose from! Painting can be a tricky job, even when you’re a dab hand at DIY. And when it comes to ceilings, it can get even tougher. We’ve put together a handy guide to help make your paint job much easier. It’s all about getting the right tools for the job and using the right techniques.

  • Rochelle - copywriter
  •  
  •  8min read
Your Guide to Painting Walls and Ceilings

1.Choosing the right paint

There are so many different types of paint and finishes to choose from, and that’s before you’ve even chosen the colour! Luckily, we’ve got the perfect paint for every room. Here are all the options so you can find the best paint to suit your home.

Silk emulsion – If you’re looking for a high sheen finish, opt for a silk paint. It’s great for enhancing paintable wallpaper and dries to a hardwearing, wipeable finish.

Matt emulsion – Ideal for a non-shiny matt finish that’s hardwearing and wipeable when dry. The matt finish also helps to reduce any imperfections on your walls because it reflects back less light which helps hide any bumps or dents.

Flat matt – If you’re after a high-quality, premium paint with a chalky finish, then flat matt’s the perfect choice. It gives excellent coverage and is perfect for uneven walls. Choose from our range of 12 exclusive colours.

One coat – Pushed for time? One coat paint is great for giving you fantastic coverage in just one coat. Just make sure the colour you’re covering over isn’t much darker than your new colour.

Bathroom and kitchen paint – If you’re planning on updating your kitchen or bathroom, a paint that’s specially formulated for these rooms is the best option. They’re mould, moisture, steam and grease-resistant, making them perfect for these busy areas of the home.

Tough and washable – Re-decorating a room that’s covered in scuffs and scrapes? Our tough and washable range will keep freshly painted walls protected. It’s 25 times tougher than standard matt paint as well as being scrubbable and stain and scuff-resistant. Perfect for play rooms, hallways and kids’ rooms.

Statement – Feature walls were made for our statement paint! Available in a range of bold colours for real impact. Use masking tape to create your own unique feature wall and mix with our statement metallic colours for a modern look.

2. Choosing the right tools

Tools are just as important as the paint in order to get the job done right and to get that professional finish. Based on your skill level, the time you have, and the finish you require, carefully consider your tools – our guide is here to help.

Paint brushes

Paint brushes are a decorating tool essential. Have at least one small brush to hand for detailed work, and a larger one for walls if you prefer it to a roller or pad.

4-6 inch wall brush – a wide brush for painting large, flat surfaces like walls and ceilings.

2 inch wall brush – an ideal size for painting smaller flat surfaces like tricky bits of wall and woodwork including doors and skirting boards.

1 inch brush – a smaller brush for doing close to the edges of walls and ceilings, as well as mouldings and door frames.

1/2 inch brush – a narrow brush for tight areas and fine detail on window frames. Cutting-in – a small brush with angled bristles for painting near to edges and into tight corners. Also good for painting window frames.

Rollers

Rollers are really quick and easy to use, applying paint three times faster than a brush. They come in a whole range of widths, weights and fabrics depending on the paint and surface you’re painting. Check our paint packaging, as it’ll help you pick the right sleeve for your painting job. Remember that you won’t be able to use a roller for the whole wall, so make sure you've got a brush to hand for the finer details.

Paint Pads

Paint pads come in a variety of shapes and sizes. They have a rectangular sponge face covered in a short mohair pile. This is fixed to a rigid plastic back which usually has a removable handle. Paint pads are great for smooth surfaces, but bear in mind that they can get caught and snag if the surface is uneven.

Handy helpers to get the job done

Fancy making your next decorating job a lot easier? Here are some of our favourite little wins to give you a helping hand.

wilko paint pail for ladders

Save time climbing up and down the ladder with this handy pail. It has 2 separate compartments with a detachable belt to hold the caddy in place around your waist, meaning you can take it up the ladder with you. It’s compatible with most standard D rung ladders and square top step ladders. The handy integrated brush comb allows you to easily wipe off excess paint whilst the roll off area allows for improved paint distribution.

wilko socket paint shield tool

Save time masking around awkward light switches and plug sockets with this handy paint shield. Simply cover the socket before painting – there's no masking needed! And when you’re done, just wipe down and it’s ready to re-use – that's a little win!

wilko mini paint container

There’s no need to find space for all those leftover paint cans thanks to this mini paint container. It’s ideal for popping any extra paint in so you have some to hand for touch ups later on. Just remember to label it with the colour!

Paint roller

3. Getting walls and ceilings ready

Before you start painting, make sure your walls and ceilings are clean, dust-free, smooth and completely dry.

We recommend sanding the surface prior to painting as this will increase adhesion and prevent the paint peeling. This is especially important if you’re painting over a silk or high gloss finish paint.

Once sanded be sure to give your walls a good wash down with sugar soap, or use our wilko sugar soap plastic-free wipes for quick and easy prep.

If you’ve got new plaster work, check and remove any blisters, fill any cracks or blemishes and rub off any fluffy patches with a rough cloth.

Priming bare plaster

If you’re painting on an absorbent surface like new plaster, you’ll need to treat your plaster with a suitable primer. We recommend using a watered-down coat of matt emulsion paint. This is usually a diluted ratio of about 1-part clean water to 4 parts paint. Apply two coats of this mixture for the best results. This allows the fresh plaster to soak up the water and prime the surface ready for your first proper coat and prevents your paint peeling or cracking.

Painting over wallpaper

If you’re painting over wallpaper with an emulsion, it’s a good idea to apply a coat of primer beforehand. Emulsion can be used over most wallpapers, just make sure the wallpaper’s in good condition, and firmly stuck down. Bear in mind that if it’s a textured wallpaper, the pattern will show through the paint whichever colour you choose.

People painting

4. Protecting your furniture and flooring

Before you get stuck into the painting, take some time to cover floors and furniture. It’s also a good idea to wear some clothes you don’t mind getting paint on just in case. Here’s just a few handy helpers to get you started.

wilko masking film

This unique product is a masking film and tape in one! Simply stick to your carpet or hard floor before rolling out to cover the whole area.

wilko laminated cotton dust sheet

The cotton material in this dust sheet soaks up liquid while the laminated backing prevents soak through, protecting your surfaces from stain damage – that’s a little win!

Top tip - make sure you’ve got a bucket of water and a sponge to wash off any splashes. Better to be safe than sorry!

Decorating

5. Getting the most from your tools

There are so many different ways to apply colour to your walls. Once you’ve chosen the right tools for the job take a look at our handy hints and tips so you can get the most from them.

Using your brushes

Follow these steps if you’re painting with brushes:

Step one

For your first coat of primer or base coat follow the instructions on the tin

Step two

Half fill a paint kettle with your paint and dip in a 50mm brush about one-third of the way up the bristles

Step three

Hold your brush at 90 degrees to the ceiling and paint a straight line across the corner between the walls and ceiling

Step four

Turn your brush parallel to the ceiling and carefully go over the first stroke, keeping the bristle close to the ceiling but not touching it. Repeat this along the bottom and tops of your walls

Step five

You can then use a bigger brush to fill in the rest. Use the edge of your brush to cut into the corner of your wall, and then paint outwards in a criss-cross fashion. Lastly, lightly brush out the paint in long strokes

Painting

Using a roller

Follow these steps if you’re using a roller:

Step one

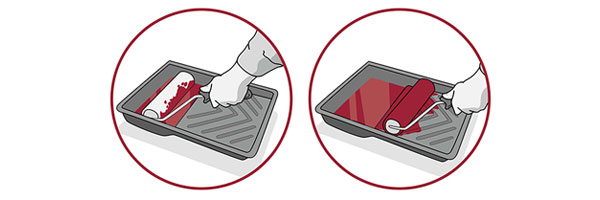
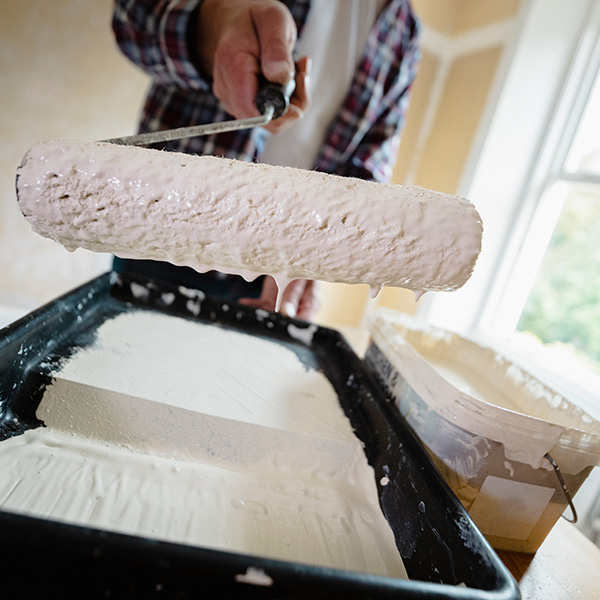
Fill your paint tray a third of the way with emulsion. Dip your roller in and roll it firmly up and down the ribbed section and ensure the paint is loaded liberally and evenly. Make sure you don’t get too much paint on your roller, it should roll freely over your walls or ceiling, without slipping or skidding

Step two

Slow vertical strokes will cut down spattering – and should be finished off with parallel strokes in one direction. Apply the paint evenly and always work from a wet edge to avoid ridges

Step three

For the best results work on 1m square sections at a time

Step four

Use a 1inch angled brush to paint into the corners

Step five

A long handled extension on your roller will make painting your ceiling a lot easier

Roller

Using paint pads

Follow these steps if you’re using paint pads to paint:

Step one

Use a large pad for the walls and ceilings, and a small pad for the edges

Step two

Rinse and fully dry pads before first use to remove any loose filaments. Load the paint pad by lightly resting the pad on the paint, just enough to coat the filaments. Overloading can cause a streaky, patchy finish or cause skidding during use

Step three

Make sure you keep your pad flat on the wall or ceiling and move it gently in random directions

Painting

6. Walls or ceilings first?

Now you’re ready to go, the big question is where do you start, walls or ceilings?

We always recommend starting with the ceiling first, that way you can paint two coats without having to worry about some of the paint accidentally being sprayed on the walls by the roller. Our Easywhite paint is perfect for painting white ceilings. It will ensure you never miss a spot again thanks to its special colour-changing formula. It goes on pink but dries intense white in 2-4 hours.

Once the ceiling has dried, cut in around the edges of the walls, taking extra care around plug sockets, skirting and door frames. Our 1 inch angled brush is great for precision work like this. It’s also a good idea to cover any woodwork at this stage to avoid any accidents.

Once you’ve done this, paint the larger areas with a larger brush or roller.

Moving down the walls, it’s now time to tackle the skirting boards. Start by sanding them down and giving them a good wash with sugar soap (or our sugar soap wipes). Next, use masking tape around the edge of the floor or carpet and the edge of the skirting board to create clean lines and prevent damage to your floor/carpet. For best results an undercoat should be used even if painting over previously painted wood. Apply the paint evenly to the skirting board, precision is key here – take your time. Once the first coat is dry you may need a second coat if you’re drastically changing the colour. Be sure to remove the masking tape as per pack instructions.

Leave the paint long enough to dry between coats, double check on the tin how long it advises to dry. If you’re planning on leaving your paint to dry overnight, you can wrap your brushes, roller sleeves and trays (with leftover paint) in cling film or tin foil, and it’ll stop them drying out. This way you don’t have to wash out your equipment or use fresh brushes or sleeves between coats or overnight – that's a little win!

7. Getting the right number of coats

The number of coats you need will depend on the type of paint you use and what you’re painting over. Follow the instructions on the tin for the best results.

If you’re worried the contrast is too great, don’t think applying thick coats of paint will work! Be patient and stick to thin layers, and just add multiple coats. If you apply the coats too thick, they could end up not drying properly and you could risk having to start all over.]If you’re painting over a dark colour or a pattern, you could need up to 3 or 4 coats of emulsion to cover it up. Make sure you leave the paint to dry between coats. ‘One coat’ emulsion may be a better option so long as the colour contrasts are not too great.

If using more than one tin of a colour, we recommend you intermix them to overcome slight batch to batch colour variation.

Now you’ve read all of our fabulous tips and tricks, you’re ready to get painting! Remember to always check the instructions on the back of the pack prior to painting.

Shop our entire decorating range on wilko.com and don’t forget to share your DIY projects with us on Facebook and Twitter.